Build BIND DLZ Nameserver with MySQL Replication
文章目录
Set up a BIND DLZ Nameserver with MySQL Replication
测试环境都是 自己搭建的virtual box 虚拟机
对运维团队来讲,构建内部的Nameserver 是非常必要的,DNS的优势非常明显,不多说。很多情况下可以通过DNS为应用、数据库、web service提供HA。
为了能够很好的管理和维护Nameserver,我们将bind的database 由文件的方式改成了数据库的方式。本文将使用mysql+bind+dlz来搭建智能的dns 服务器。
Bind 官网 : https://www.isc.org/downloads/bind/
Bind-DLZ官网 :http://bind-dlz.sourceforge.net .
DLZ(Dynamically Loadable Zones)与传统的BIND9不同,BIND的不足之处:
- BIND从文本文件中获取数据,这样容易因为编辑错误出现问题。
- BIND需要将数据加载到内存中,如果域或者记录较多,会消耗大量的内存。
- BIND启动时解析Zone文件,对于一个记录较多的DNS来说,会耽误更多的时间。
- 如果近修改一条记录,那么要重新加载或者重启BIND才能生效,那么需要时间,可能会影响客户端查询。
而Bind-dlz 可以解决这类似问题, 对记录的修改都直接修改数据库中的记录。 也很容易做相关的管理工具。
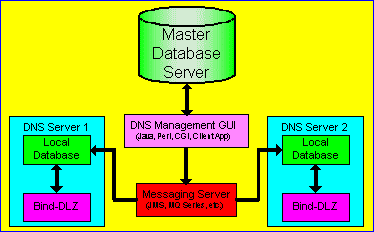
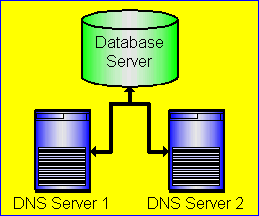
BIND-DLZ生产架构
最佳实践 good


最坏实践 bad

BIND-DLZ安装配置
安装 bind 最新版本 bind-9.10.1
安装 bind,由于公司用的 percona 版本的数据库,需要设置一些 client的lib包
1 | ln -s /usr/local/mysql/lib/libperconaserverclient.so /lib64/libmysqlclient.so |
- 至此 bind 安装完毕
配置bind
生成named的配置
1 | cd /usr/local/bind/etc |
在named.conf中添加配置文件
1 | include "/usr/local/bind/etc/CHINANET.acl"; //联通ACL |
下载联通和电信的配置:
1 | wget http://www.centos.bz/wp-content/uploads/2012/02/CHINANET.acl |
配置view
和也就是 DLZ的核心,官网MySQL driver文档 link 还可以查看其它类型的数据库的对应文档。
搭建mysql数据库,并构建复制环境
创建dns的database
create database dnsdb;创建dns record的表结构
官方配置
1 | dlz "Mysql zone" { |
> 我们的配置
1
2
3
4
5
6
7
8
9
10
11
12
13
14
15
16
17
18
19
20
21
22
23
24
25
26
27
28
29
30
31
32
33
34
35
36
37
38
39
view "CHINANET_view" {
match-clients { CHINANET; };
allow-query-cache { none; };
allow-recursion { none; };
allow-transfer { none; };
recursion no;
dlz "Mysql zone" {
database "mysql
{host=192.168.19.134 dbname=dnsdb ssl=false port=3307 user=dnsdata pass=dnsdata}
{select zone from dns_records where zone = '%zone%' and view = 'any' limit 1}
{select ttl,type,mx_priority,case when lower(type)='txt' then concat('\"',data,'\"') when lower(type) = 'soa' then concat_ws(' ', data, resp_person, serial, refresh, retry, expire, minimum) else data end as mydata from dns_records where zone = '%zone%' and host = '%record%' and view=(select view from dns_records where zone = '%zone%' and host = '%record%' and (view='CHINANET' or view='any') order by priority asc limit 1)}";
};
};
view "CNC_view" {
match-clients { CNC; };
allow-query-cache { none; };
allow-recursion { none; };
allow-transfer { none; };
recursion no;
dlz "Mysql zone" {
database "mysql
{host=192.168.19.134 dbname=dnsdb ssl=false port=3307 user=dnsdata pass=dnsdata}
{select zone from dns_records where zone = '%zone%' and view = 'any' limit 1}
{select ttl,type,mx_priority,case when lower(type)='txt' then concat('\"',data,'\"') when lower(type) = 'soa' then concat_ws(' ', data, resp_person, serial, refresh, retry, expire, minimum) else data end as mydata from dns_records where zone = '%zone%' and host = '%record%' and view=(select view from dns_records where zone = '%zone%' and host = '%record%' and (view='CNC' or view='any') order by priority asc limit 1)}";
};
};
view "any_view" {
match-clients { any; };
allow-query-cache { none; };
allow-recursion { none; };
allow-transfer { none; };
recursion no;
dlz "Mysql zone" {
database "mysql
{host=192.168.19.134 dbname=dnsdb ssl=false port=3307 user=dnsdata pass=dnsdata}
{select zone from dns_records where zone = '%zone%' and view = 'any' limit 1}
{select ttl,type,mx_priority,case when lower(type)='txt' then concat('\"',data,'\"') when lower(type) = 'soa' then concat_ws(' ', data, resp_person, serial, refresh, retry, expire, minimum) else data end as mydata from dns_records where zone = '%zone%' and host = '%record%' and view = 'any'}";
};
};
Debug 测试
使用debug模式启动 bind 服务,可以看到终端会有相关的输出,如果没有报错,说明配置正常。
1 | /usr/local/bind/sbin/named -uroot -g -d 9 |
启动Bind服务
Reload 配置
1 | #命令 |
启动服务
1 | #启动 bind 服务. |
配置DNS 记录
- 配置soa记录
- 配置ns1 ns2
- 配置dns记录
-SOA(起始授权机构):此记录指定区域的起点。它所包含的信息有区域名、区域管理员电子邮件
地址,以及指示辅 DNS 服务器如何更新区域数据文件的设置等
-NS(名称服务器):此记录指定负责给定区域的名称服务器
-A(主机): 此记录列出特定主机名的 IP 地址。1
2
3
4
5
6
7
8
9
10
11
12
13INSERT INTO `dns_records` (`zone`, `host`, `type`, `data`, `ttl` , `mx_priority`, `refresh`, `retry`, `expire`, `minimum`, `serial`, `resp_person`, `primary_ns`, `data_count`) VALUES
('opsdnstest.com', '@', 'SOA', 'ns1.opsdnstest.com.', 10, NULL, 3600, 3600, 86400, 10, 2008082700, 'root.opsdnstest.com.', 'ns1.opsdnstest.com.', 0);
#--@ NS
INSERT INTO `dns_records` (`zone`, `host`, `type`, `data`)
VALUES ('opsdnstest.com', '@', 'NS', 'ns1.opsdnstest.com.');
#--NS A
INSERT INTO `dns_records` (`zone`, `host`, `type`, `data`)
VALUES ('opsdnstest.com', 'ns1', 'A', '192.168.19.135');
# --A
INSERT INTO `dns_records` (`zone`, `host`, `type`, `data`, `ttl`, `view`,`priority`) VALUES
('opsdnstest.com', 'db' , 'A', '192.168.19.135', 3600, 'any',200),
('opsdnstest.com', 'app', 'A', '192.168.19.134', 3600, 'any',200),
('opsdnstest.com', 'dev', 'A', '192.168.19.132', 3600, 'any',255); - 验证dns 配置
1
2
3
4
5
6
7
8
9
10
11
12
13
14
15
16
17
18
19
20
21
22
23
24
25配置机器的 /etc/resolv.conf
[root@mytestdb01 ~]# cat /etc/resolv.conf
# Generated by NetworkManager
domain opsdnstest
search opsdnstest.com
nameserver 192.168.19.132
ping db.opsdnstest.com
[root@mytestdb01 ~]# ping db.opsdnstest.com
PING db.opsdnstest.com (192.168.19.135) 56(84) bytes of data.
64 bytes from 192.168.19.135: icmp_seq=1 ttl=64 time=0.044 ms
64 bytes from 192.168.19.135: icmp_seq=2 ttl=64 time=0.034 ms
64 bytes from 192.168.19.135: icmp_seq=3 ttl=64 time=0.030 ms
^C
ping dev.opsdnstest.com
[root@mytestdb01 ~]# ping dev.opsdnstest.com
PING dev.opsdnstest.com (192.168.19.132) 56(84) bytes of data.
64 bytes from 192.168.19.132: icmp_seq=1 ttl=64 time=0.519 ms
64 bytes from 192.168.19.132: icmp_seq=2 ttl=64 time=0.517 ms
^C
ping app.opsdnstest.com
[root@mytestdb01 ~]# ping app.opsdnstest.com
、PING app.opsdnstest.com (192.168.19.134) 56(84) bytes of data.
64 bytes from 192.168.19.134: icmp_seq=1 ttl=64 time=2.16 ms
64 bytes from 192.168.19.134: icmp_seq=2 ttl=64 time=0.227 ms
^C至此基本的Bind DLZ的构建已经完成,接下来我会整理一套 DNS原理架构的文章。以及真正的企业实施方案。
总结
1 | DNS强大,使用广泛,本文主要结合bind 和dlz 一起来搭建内部域名服务器, |

